AI Sales Agent Fine-Tuning Guide

AI Sales Agent Fine-Tuning Guide
This guide helps you fully set up and improve your AI sales agent – from avatar and website training to lead capture, voice setup, and conversation improvement. Each step includes what to do + why it matters for better results.
Updated on Feb 14, 2026 · 5 min read
I. Avatar Setup
Uploading Your Avatar:
- Open AI Agent Settings : Open your AI sales agent dashboard in your browser. Enter your email and password, then click on the Login button. After you log in, look at the left side of the screen where the menu is shown. In this menu, find the option called “AI Agent Settings” and click on it to open the settings page.
- Open AI Agent Settings : Open your AI sales agent dashboard in your browser. Enter your email and password, then click on the Login button. After you log in, look at the left side of the screen where the menu is shown. In this menu, find the option called “AI Agent Settings” and click on it to open the settings page.
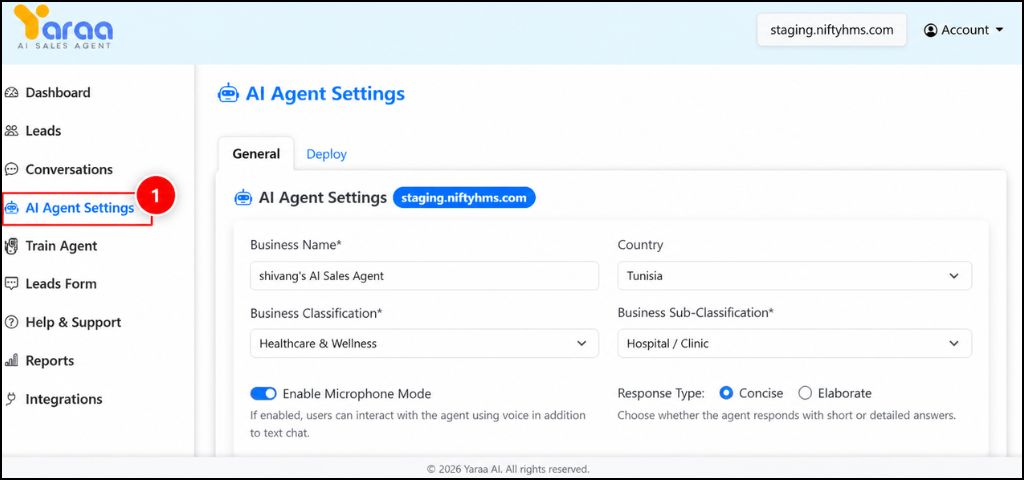
- Navigate to AI Agent Settings : Go to the left side menu and click on “AI Agent Settings.” This will open the settings page where you can adjust your avatar options.
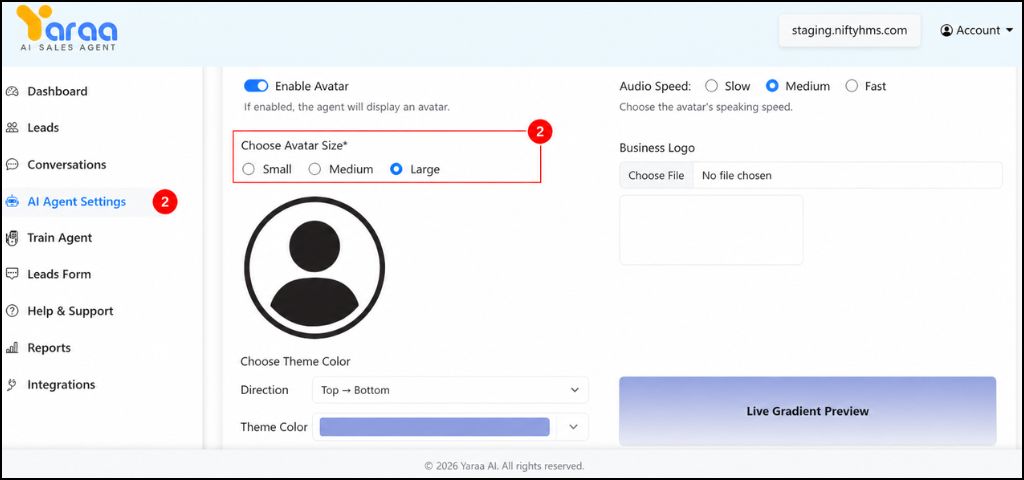
- Large : Best for high visibility and user attention.
- Medium : Balanced size, suitable for most websites.
- Small : Minimal design, uses less space.
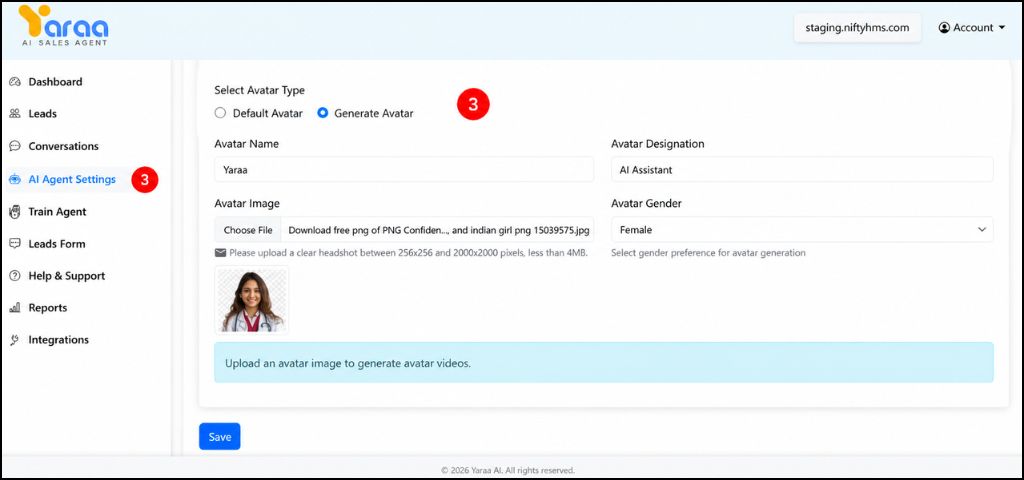
- Generate Avatar : Scroll down to the “Select Avatar Type” section, choose your preferred avatar style, and click on “Generate Avatar.”
- This creates a visual identity for your AI agent.
- A human-like avatar helps build trust with users.
- People are more likely to interact when they see a friendly face instead of a simple chat box.
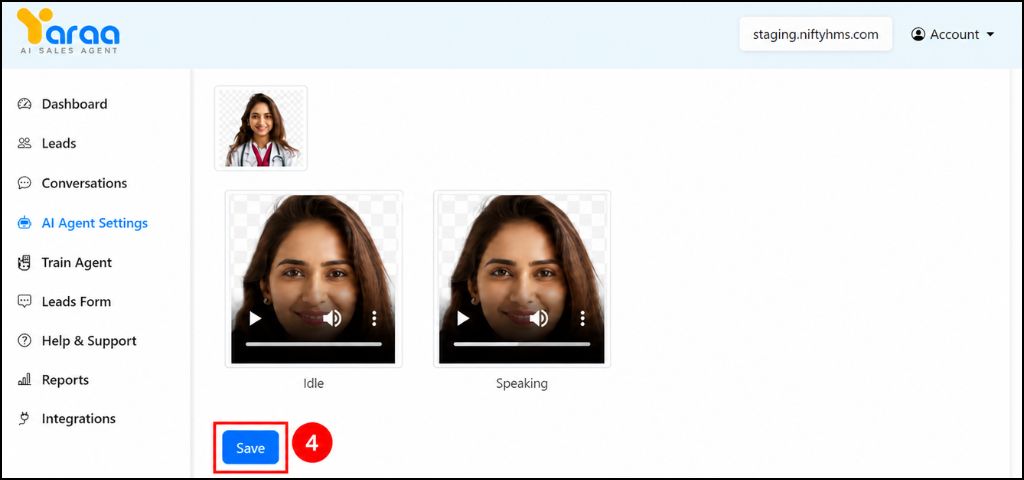
- Save Changes : Scroll down to the bottom of the page and click on the “Save” button.
II. Website Links Configuration
Setting Up Links :
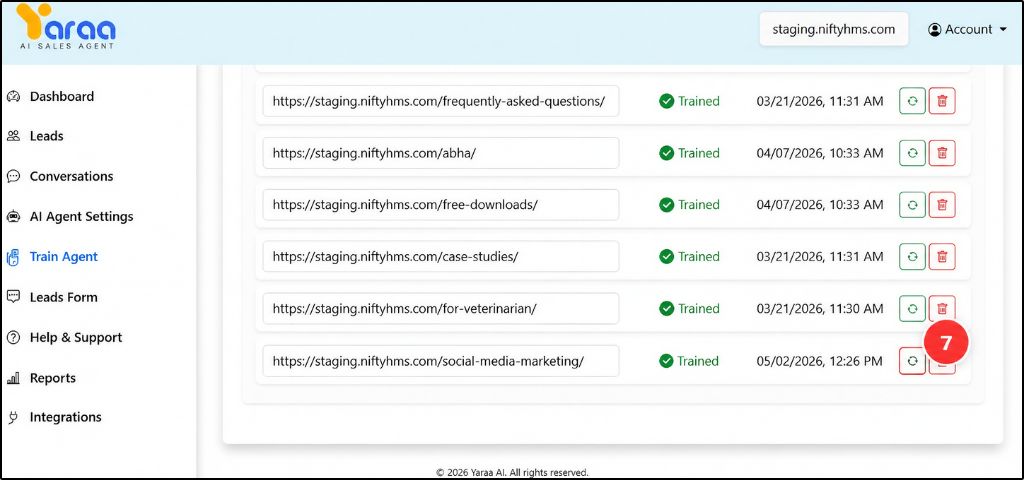
- Add Website URL : Go to “Train Agent” from the left side menu, then click on “Add URL.”
- This step connects your website content to your AI agent.
- The AI will read and understand your website pages.
- It helps the AI give better answers based on your content.
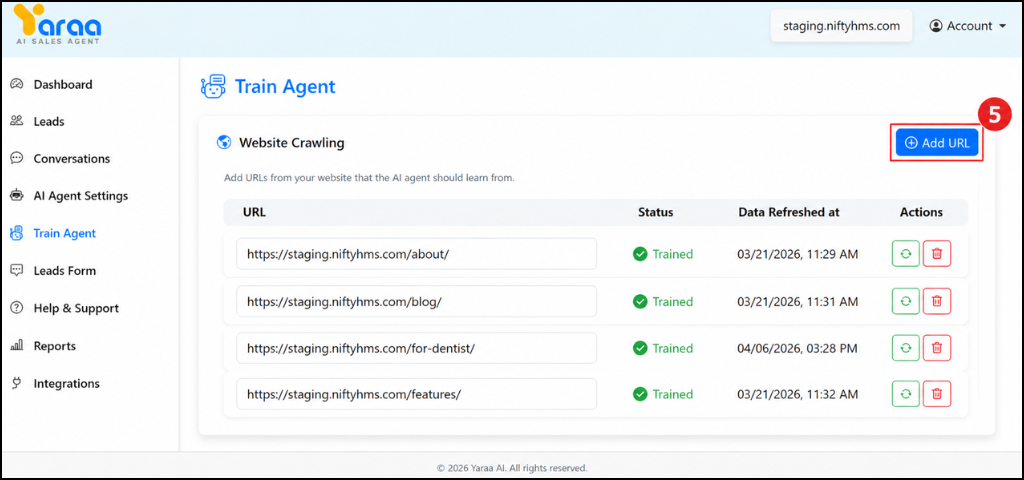
- Paste and Save URL: Paste your website URL in the given field, then click on “Save.”
- The AI agent will start learning from your website content such as services, pricing, and FAQs.
- This helps the AI provide accurate and relevant answers to users.
- Sync Links After Updates: Click on “Sync Links” whenever you make changes to your website.
- This keeps your AI agent updated with the latest content.
- Helps avoid outdated or incorrect answers.
- Keeps responses accurate and builds user trust.
III. HTML Form Integration
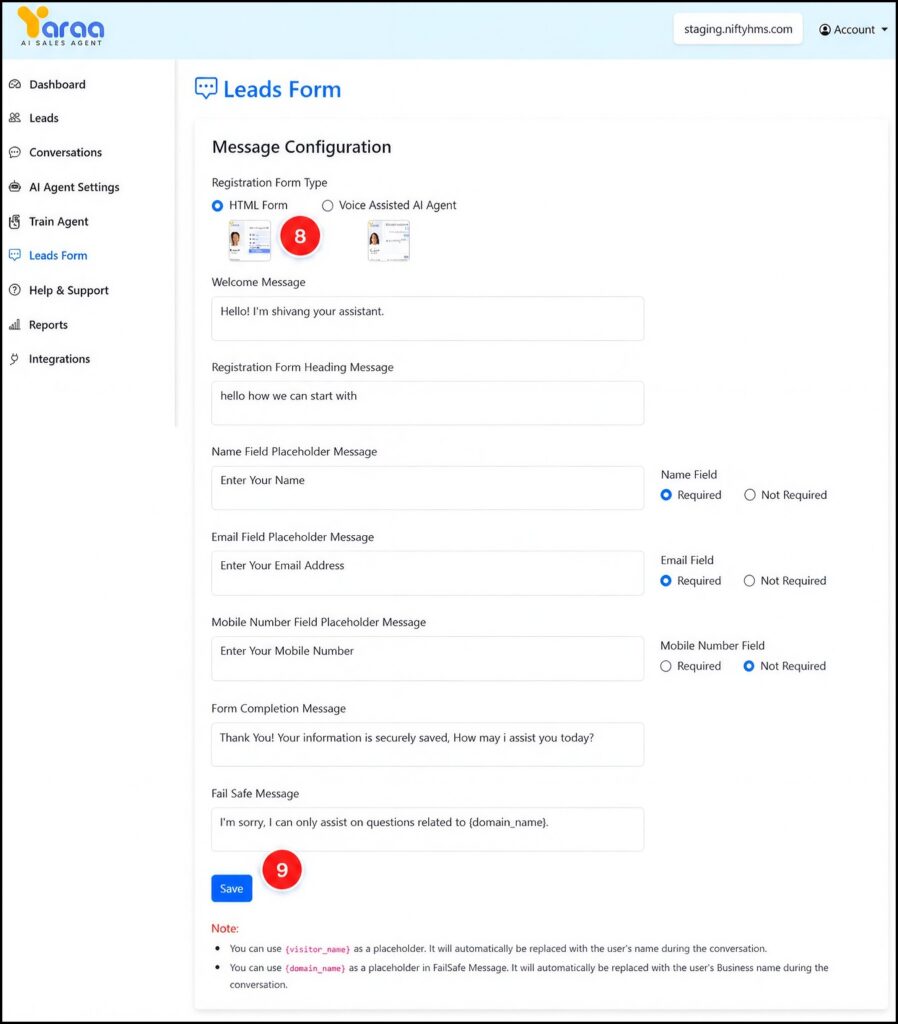
- Open Lead Forms: Go to the left side menu and click on “Lead Forms,” then select “HTML Form.”
- Edit and Save Form: Edit the form fields such as name, email, phone, and message, then click “Save.”
- A clear form helps users submit details quickly.
- Clean and structured data improves lead quality.
- Helps your team respond faster.
Why This Matters:
👉 Makes it easy for users to share their details
👉 Improves lead conversion
👉 Ensures accurate data collection
👉 Supports better follow-up and marketing

IV. Conversation Correction & Optimization
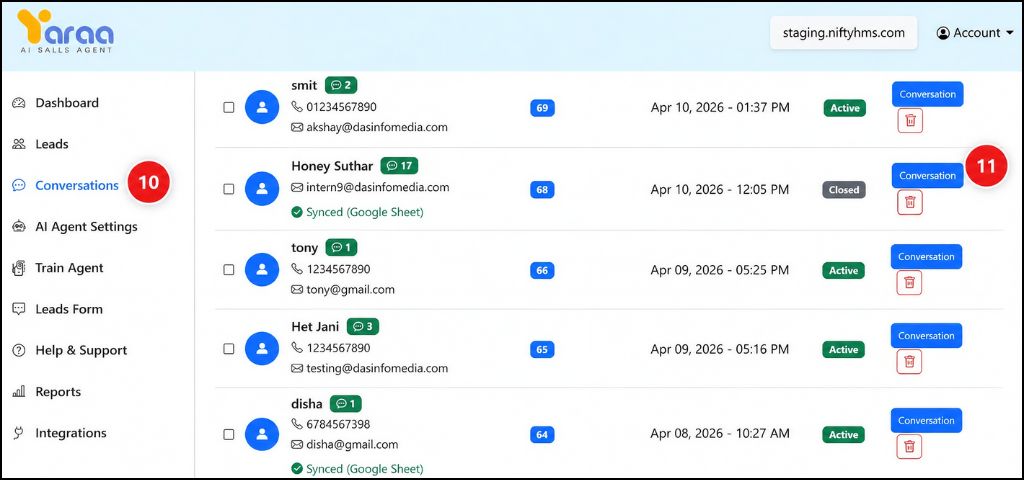
- Open Conversations: Go to “Conversations” from the left side menu.
- This section shows all chats between users and your AI agent.
- Select a Conversation: Click on any “conversation” to open it.
- You can see what users asked and how the AI replied.
- Helps understand user needs and common questions.
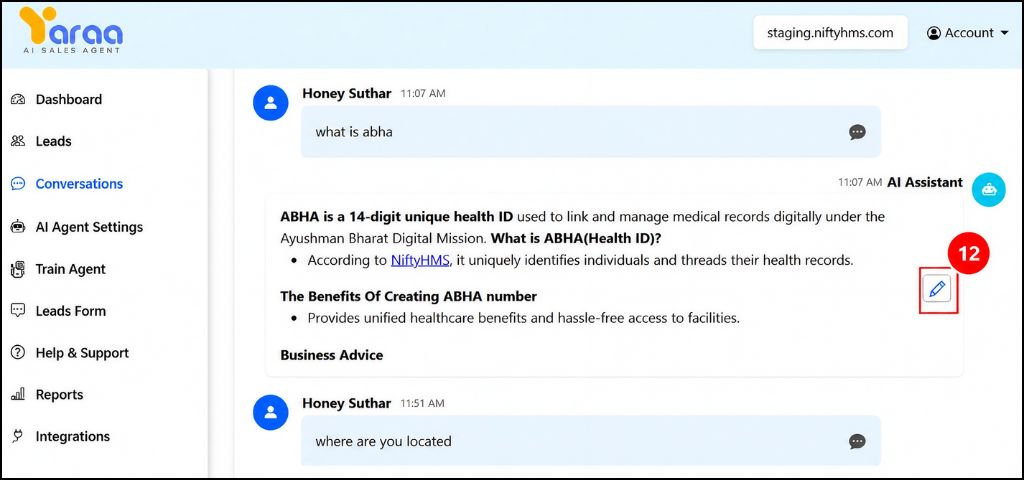
- Edit AI Reply: Click the ✏️ (pencil icon) on the AI response to open the edit option.
- You can correct wrong information or improve the clarity of the answer.
- Update the response based on what users are asking.
- This helps your AI give better and more accurate replies in future conversations.
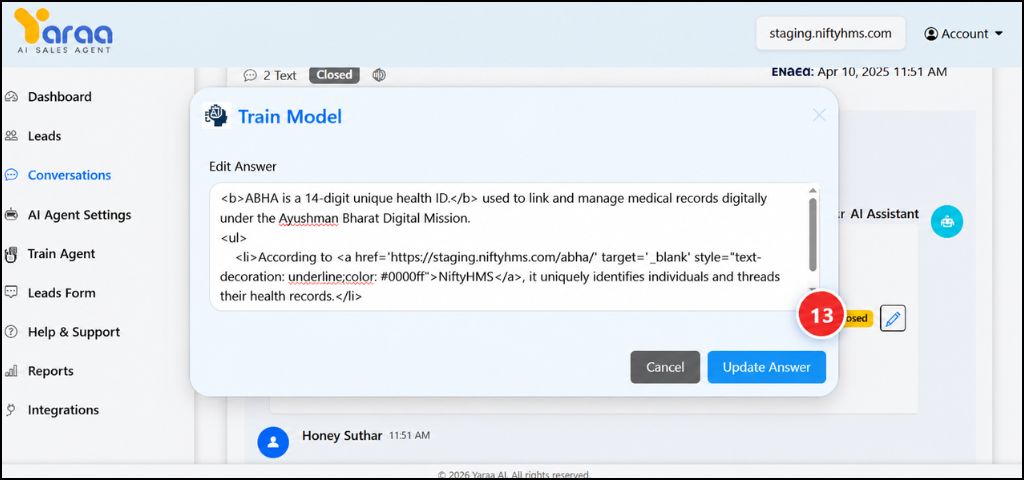
- Save Updated Reply: After editing, click “Save.”
- The AI will use this updated answer in future chats.
- Over time, responses become more accurate.
Why This Matters:
👉 Fix wrong answers quickly
👉 Train AI without technical skills
👉 Improve user experience
👉 Build trust and increase conversions
- Open AI Chat Page: Add this path after your domain: /yaraa-ai-sales-agent/
- Example: yourwebsite.com/yaraa-ai-sales-agent/

How This Helps Marketing & Campaigns:
👉 Share this link in ads, WhatsApp, email, and SMS
👉 Send users directly to AI chat instead of forms
👉 Start real-time conversations instantly
Benefits:
👉 24/7 automated lead capture
👉 Faster response time
👉 Less manual effort
👉 Higher campaign conversions
VI. Custom Voice Configuration (Essential Plan Required)
- Create Voice Account: Sign up on ElevenLabs and open your dashboard. This platform allows you to create a custom AI voice.
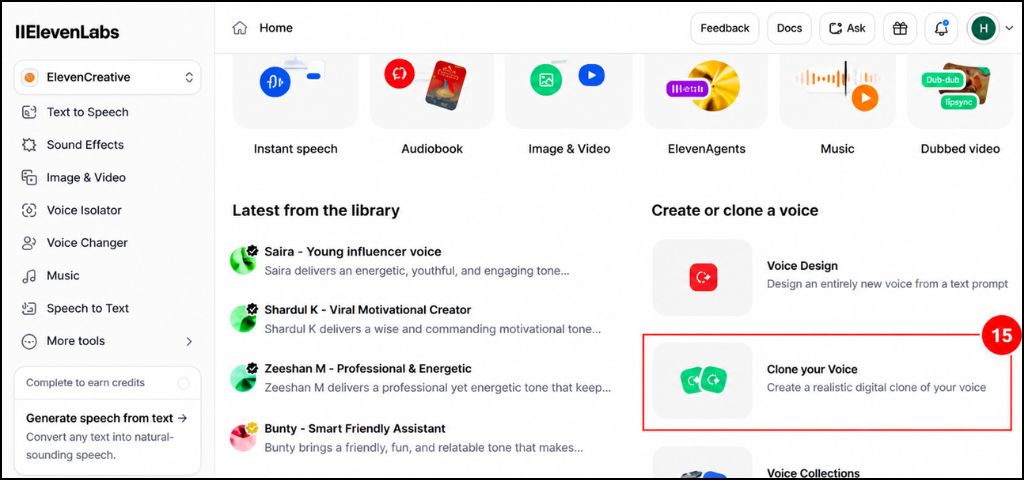
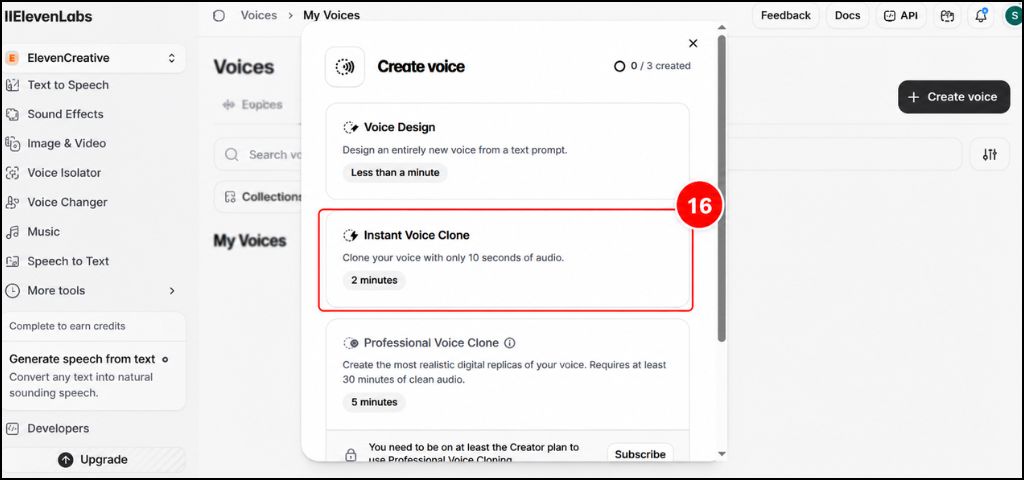
- Start Voice Cloning: Click on “Instant Voice Clone.” Quick way to generate your voice.
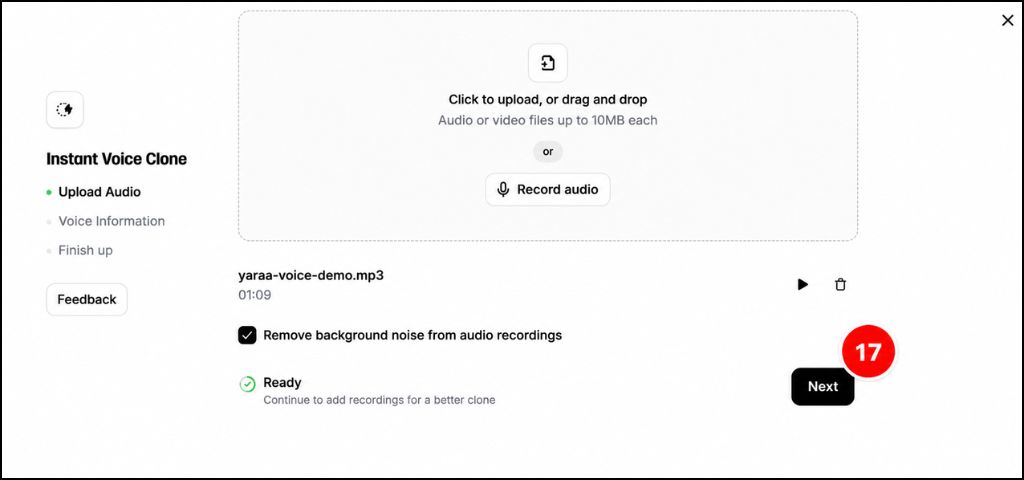
- Upload or Record Audio: Upload or record your voice, then click “Next.” The system creates a realistic voice model.
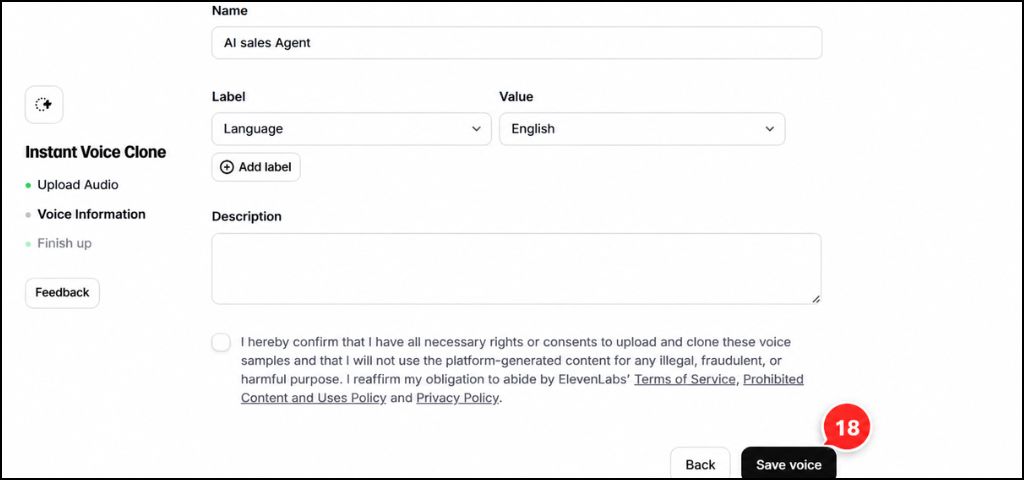
- Save Voice Details: Add voice name and details, then click “Save.” Your custom voice is ready.
- Open AI Agent Settings: Go to “AI Agent Settings” in your dashboard.
- Upload Voice File: Upload your MP3/MP4 file and click “Save.”
- Your AI agent will now respond using your custom voice.
- Creates a unique brand experience and builds trust.
VII. Improve Knowledge Base (Essential Plan Required)
- Open Training Section:Go to “Train Agent” from the left side menu of your dashboard.
- This section is used to add and manage all the information your AI agent will use to answer user questions.
- The more content you add here, the more accurate and helpful your AI responses will become.
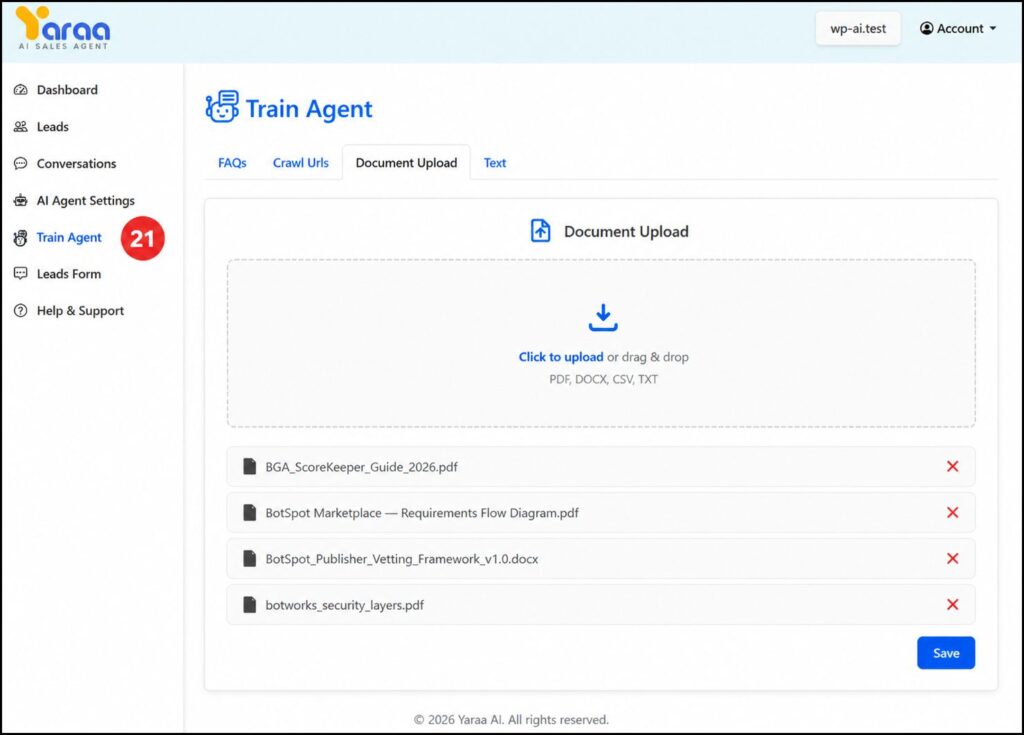
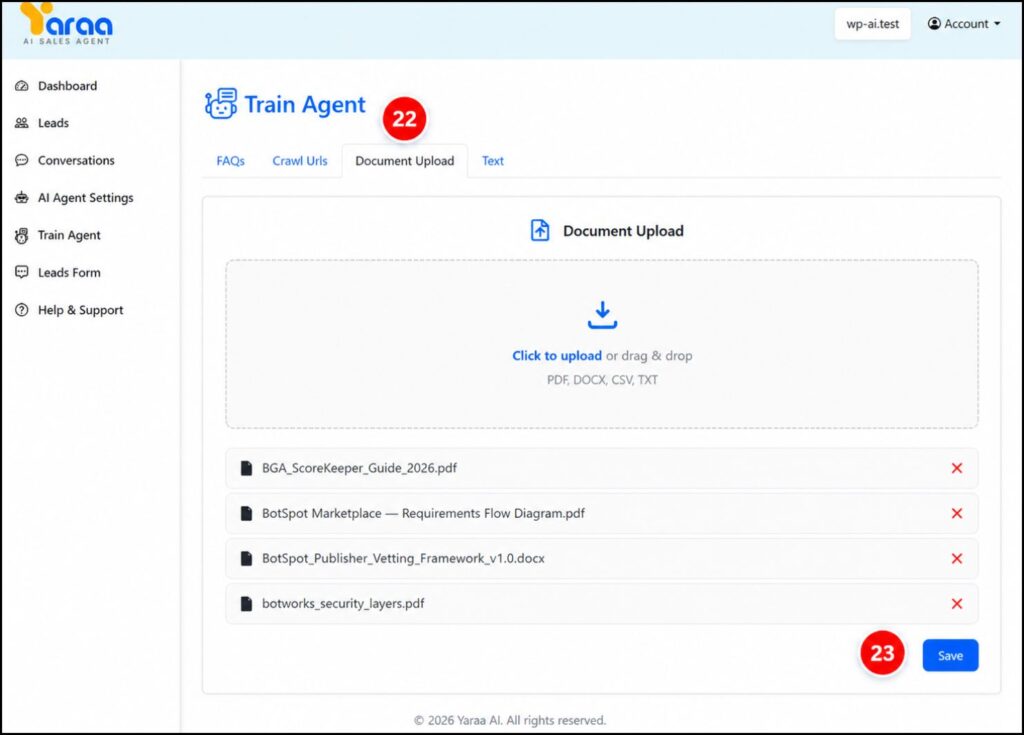
- Save Voice Details: Click on “Document Upload.” This option allows you to add files that contain important business information.
- Add Files:Upload your files by selecting them from your system or by using drag and drop, then click on “Upload.”
- You can upload PDFs, guides, brochures, service details, or any business-related documents.
- The AI reads and understands this content to answer user queries.
- This is useful for adding detailed information without typing everything manually.
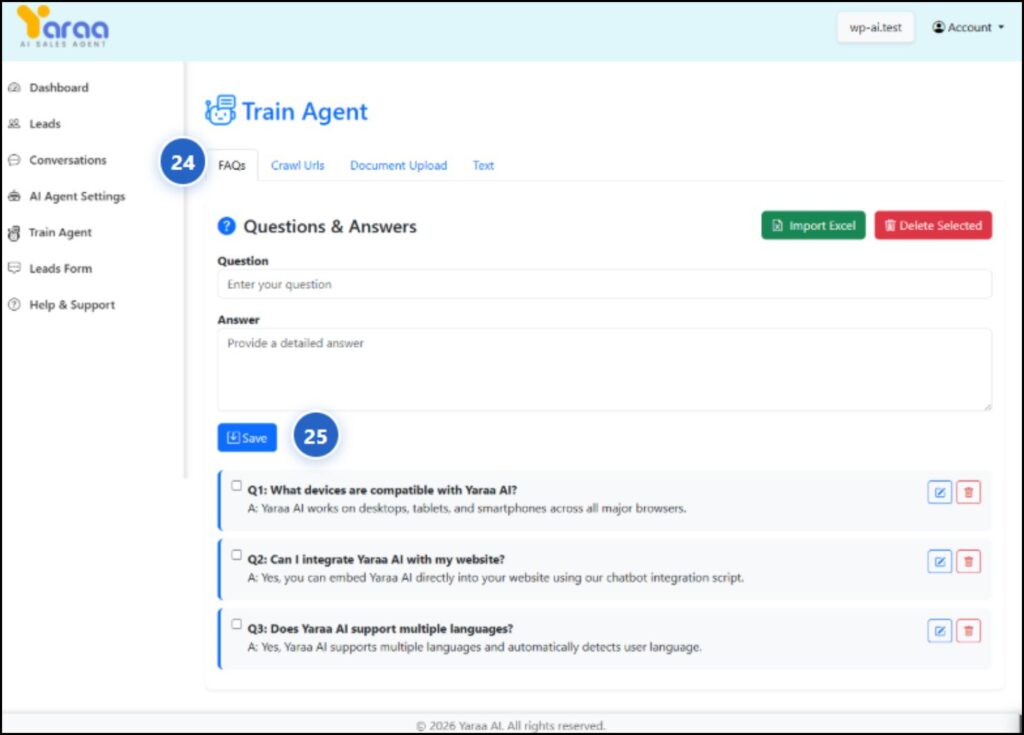
- Add FAQ: Click on “FAQ” inside the Train Agent section. This section is used to add common questions and their answers.
- Save Questions and Answers: Enter your questions and their correct answers, then click “Save.”
- Helps the AI quickly respond to frequently asked questions.
- Ensures consistent and accurate replies for common user queries.
- Reduces repetitive manual responses from your team.
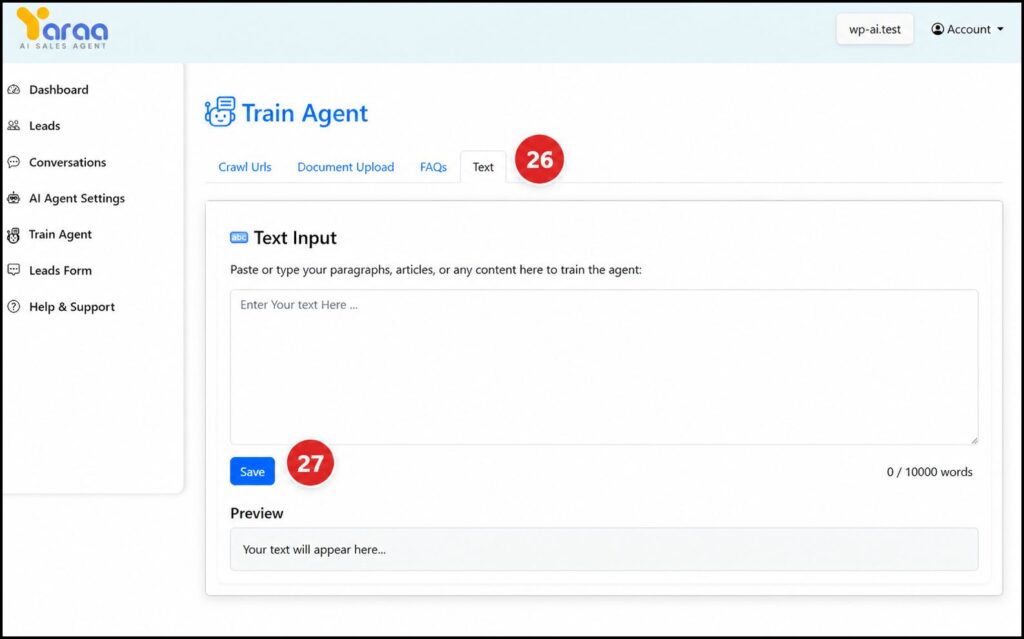
- Add Text Content: Click on “Text.” This allows you to directly add custom written content.
- Save Content: Paste your content such as service descriptions, company information, or detailed explanations, then click “Save.”
- This improves the AI’s understanding of your business.
- Helps generate more relevant and detailed responses.
- Makes your AI agent smarter over time as more content is added.
Why This Matters
👉 Provides accurate and detailed answers to users
👉 Reduces dependency on manual support
👉 Improves user experience and engagement
👉 Helps capture better quality leads through correct information
👉 Continuously improves AI performance over time
If you want, I can next convert this into UI design (step cards with colors) or a premium PDF layout.
VIII. Conversation Summary
- Check Your Email: Go to your email inbox to view the conversation summary sent after each user interaction.
- The system automatically sends a detailed report to the admin email after every chat.
- This helps you stay updated on user questions, captured leads, and overall activity without checking chats manually.
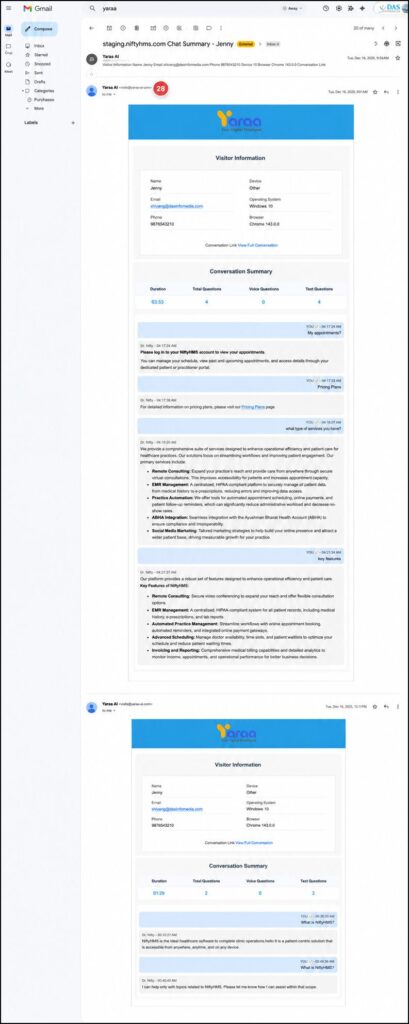
What You Get in the Summary Email:
👉 Complete conversation history between user and AI
👉 User details such as name, email, and phone number
👉 Key highlights and user intent
👉 Lead information for quick follow-up
👉 This allows your team to respond faster, track leads easily, and make better decisions using real data.
Ready to boost your website’s performance with Yaraa AI? Get started today with a FREE 730-day trial: Yaraa AI Sales Agent